Pages

Tuesday, August 6, 2013

Understanding Android Project Structure (Eclipse)

In my previous post I showed you how to create a simple Hello World Android application. This post is about understanding the Android project structure with Eclipse.

As the Android project is also a simple JAVA project there is not much more difference between any standard JAVA project and Android project.

Android Project Structure
The above image shows the typical Android project structure in Eclipse IDE. Let's take a folder one by one.

assets/
This folder is empty. You can use it to store any raw files. All the files you save here are compiled into an .apk file as it is, and the original file name is preserved. You can navigate this directory in the same way as a typical file system using URIs and read files as a stream of bytes using the AssetManager.

gen/
This folder contains the all the JAVA files generated by ADT (Android Developer Tools), such as your R.java file, interfaces, etc.

res/
This folder contains Android application resources, such as layout files, drawable files, string values, etc.
  • colors/
    This folder is used to store XML files that describe colors.
  • drawable/
    This folder is meant for Bitmap files like PNG, JPEG, GIF and XLM files that describe any Drawable shapes or Drawable objects.
  • layout/
    All the XML files that are compiled into screen layouts and part for the Android application screen.
  • values/
    This folder stores all the XML files that are compiled into many kinds of resource. Unlike other resources in the res/ directory, resources written to XML files in this folder are not referenced by the file name. Instead, the XML element type controls how the resources is defined within them are placed into the R class.
  • menu/
    This folder is used to store the XML files that define application menus.
AndroidManifest.xml
Every Android application must have an AndroidManifest.xml file. The file name should not be change to any other name. Also the file should be in the root directory of your Android project. This file represents all the essential information about the Android application to the system. This information is used before the any of the application's code runs.

Thursday, August 1, 2013

Hello World Android

In my previous post I showed you how to setup a Android development environment. In this post I will show you writing your first Hello World Android application.

  1. Go to File Menu -> New -> Android Application Project.

    Drilling JAVA
    Hello World Android
  2. You will see the below screen once you click on the Android Application Project.

    Hello World Android
    Creating New Android Project

    The Application name and the project name can be differ as the project name is only used by the eclipse. But it should be unique in the workspace. Later on the application name will be used for creating the apk file. For example here the apk file will be created as HelloWorld.apk.

  3. Now it's time to configure the Android project. Here you can define the eclipse workspace location, Creating custom icon for you application, etc. 

    Drilling JAVA
    Configuring Android Project
  4. Now it's time to create your Android application icon. This icon will be displayed with the apk file as well as after installing the application as a short cut.

    Drilling JAVA
    Android Application Icon Creation
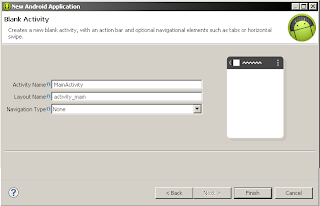
  5. After clicking on next you will see the below screen. This screen offers you to create the main activity where the application starts. It is a starting point of any android application.
    Android Activity Creation
    Create Android Activity
    Select blank activity for now. It will create a new blank activity, with an action bar and optional navigational elements such as tabs or horizontal swipe.
  6. Once you click on next after creating the blank activity, you will see the below screen. This screen is meant for defining a custom name for the main activity. By default it is MainActivity and layout name is main_activity.xml.
    Android Main Activity
    Configuring Android Main Activity
  7. On click of finish, the project will be created in the eclipse workspace.


Saturday, July 27, 2013

Understanding Android SDK Manager

The original SDK package you have downloaded includes only the SDK tools. The Android SDK is a separate tools, platforms and other components into packages you can download using the Android SDK Manager. To develop an Android app, you must have downloaded at least one Android platform and the latest SDK platform tools.

There are several different packages available for the Android SDK.ded at least one Android platform and the latest SDK platform tools. I will show you how to add Platforms and Packages.

First of all, launch the SDK Manager.
  • If you are using Eclipse then go to Windows > Android SDK Manager
  • On Windows, double-click the SDK Manager.exe file at the root of the Android SDK directory.
  • On Mac or Linux, open a terminal and navigate to the tools/ directory in the Android SDK, then execute android sdk.
Once you open the SDK Manager, it will show you the below window.
Drilling Android
Android SDK Manager
Here you can choose all the packages you want to download by selecting the checkboxes. Once you select all the packages you want to use, click on Install to downlaod and install the selected packages.


Tuesday, July 23, 2013

Easiest way to setup Android Development Environment

In my previous post I showed you how to set up an Android development environment using existing IDE. In this post I will show you how you can setup the Android development environment in easy way and start creating apps.

All you need to do is download the ADT Bundle that's it. The ADT Bundle is incorporated with all the things you required to start developing Android apps. It includes a version of the Eclipse IDE with build in Android Developer Tools generally called ADT.

After downloading the ADT Bundle which is a .zip file you need to install the SDK and Eclipse IDE. Follow the below steps to do so.


  • Unpzip the ZIP file (named adt-bundle-.zip) and save it to an appropriate location, such as a "Android_Development" directory in your home directory.
  • Then open the adt-bundle-/eclipse/ directory and click on eclipse.exe to launch eclipse.

Please keep in mind that Never ever try to shift any of the files or directories from the adt-bundle directory. If you do so, the ADT will not be able to locate the SDK and you will have to manually update the ADT from preferences.

Great! Now the IDE is already loaded with the Android Developer Tools plugin and the SDK is ready to go. In my next blog I will show how to develop your first Android app.


Monday, July 22, 2013

How to setup a development environment for Android?


It is very easy to setup a development environment for Android. All you need is computer and Internet connection. Below steps will be helpful if you want to use your existing IDE for Android development.

  1. As we know, Eclipse is the best and evergreen tool for JAVA developer. I personally suggest Eclipse for Android development. Download and install Eclipse.
  2. Now, its time to download the Android Development Tools (ADT) plugin for eclipse. ADT is a powerful integrated environment provided by the Android. By using this plugin you can expand the capabilities of Eclipse to let you quickly set up a new Android project, debug app, build an app User Interface and export signed or unsigned app packages generally called APK file for distribution. Below are the steps for setting up the ADT.
    1. Start Eclipse, then select Help > Install New Software.
    2. Click on Add button, at the top-right corner.
    3. There is a Add Repository dialog that appears, enter "ADT Plugin" or any other name for the Name and the below URL as Location. Click ok.
    4. Some user run into trouble while downloading the ADT, if this is the case with you then try using "http" in the Location URL, instead of using "https".
    5. In the Available Software dialog, select the checkbox next to Developer Tools and click Next.
    6. In the next window, you'll see a list of the tools to be downloaded. Click Next.
    7. Read and accept the license agreements, then click Finish. If you get a security warning saying that the authenticity or validity of the software can't be established, click OK.
    8. On completion of ADT plugin installation, you need to restart the Eclipse.
  3. Now its time to configure the ADT Plugin. You have to specify the Android SDK directory location once Eclipse restart.
    • In the "Welcome to Android Development" window that appears, select Use existing SDKs.
    • Browse and select the location of the Android SDK directory you recently downloaded and unpacked.
    • Click on Next.
That's it, Your Eclipse IDE is now set up to develop Android apps, but you need to add the latest SDK platform tools and an Android platform to your environment.

In my next post I will show you the much more easy way for setting up the Android development environment.