Pages

Monday, June 9, 2014

My DayDream Android App

Want to get useful information while your Android mobile is getting charged or in dock mode? Or are you board of the old type of clock that shown when your mobile is getting charged?

Install the My DayDream app on your Android mobile that will show you useful information while your mobile is getting charged...

My DayDream Features

This app will show you below information on your mobile.
  • Missed call count
  • Unread SMS count
  • Next alarm
  • Current time
  • Internet connectivity status
  • Battery percentage 
My DayDream
While mobile is getting charged

You don't need to touch your mobile screen to see all the above information. Just set My DayDream as a daydream service and relax. To set My DayDream as a dream service go to Settings -> Display -> DayDream -> My DayDream.


You can set your name and also enable/disable notification by going into My DayDream Settings.

https://play.google.com/store/apps/details?id=com.sign.mydreamservice.app
Configuration for DayDream

Click here
to download My DayDream app for your Android Mobile...


Thursday, May 22, 2014

Mobile Internet Data Timer Android App (Smart way to use mobile internet)


Do you have limited internet data pack?

Are you running out of mobile internet data every month?

Here is the way to use your mobile data smartly...
Data Timer for Android

This app will help you to save your internet data, battery life, time and money by automatically turning on and off your mobile data at given time.

Features:
  • Automatic turning on/off mobile data at given time.
  • Periodic mobile data on and off.
  • Mobile data can be turned off automatically on given date. Generally we set last date of our mobile data internet pack.
  • Mobile data can be turned off automatically at given battery level.
  • Notification shown when mobile data turning on/off by this app.
  • One touch mobile data on/off button.

Benefits:

  • Save mobile data bytes.
  • Periodic mobile data on and off sets you free, by delivering updates on certain interval.
  • Save battery life.
  • Save money as it saves mobile data bytes.
  • You can have sound sleep at night by not getting disturbed by your mobile.
Click here to download free version of this app.

Data Timer
Dashboard
Data Timer
Set Time
Data Timer
Set Date
Data Timer
Set Periodic Interval for Internet
https://play.google.com/store/apps/details?id=com.sign.datasaverpro.app
Help

Data Timer Android
Notifications


Note: All the operations performed by this app are with primary SIM card only, so if you use dual SIM mobile make sure that the SIM with active data pack is in primary SIM slot.

Download Data Timer Now (Free)

Tuesday, March 18, 2014

DayDream feature of Android 4.2+


Dreams are new features of Android 4.2+ version. They are interactive screensavers launched when a charging device is idle, or docked in a desk dock. Dreams provide another modality for apps to express themselves, tailored for an exhibition/lean-back experience.

We can develope a dream for Daydream by simply implementing a subclass of DreamService. The DreamService APIs are much more similar to those of Activity

For developing your own daydream feature, we have to create One java class that extends DreamService and make entry in AndroidManifest.xml file about Dream service.

Step 1:
Create a simple Android project from your IDE.

Step 2:

 package com.sign.mydaydream;  
 import android.service.dreams.DreamService;   
 import android.graphics.Color;  
 import android.widget.TextView;  
 public class MyDayDreamService extends DreamService {  
   @Override  
   public void onAttachedToWindow() {  
           super.onAttachedToWindow();  
     /*  
        * Allow user to touch while dreaming to make it interactive.  
           */  
     setInteractive(true);  
     /*  
        * Hide the notification bar to run it in full screen.  
           */  
     setFullscreen(true);  
     /*  
     * You can either give any layout id to display as daydream or   
           * build UI for daydream by yourself.  
     */            
     TextView tView = new TextView(this);  
     tView.setText("Hello DayDream by Sanket Shah!");  
     tView.setTextColor(Color.rgb(144, 225, 220));  
     tView.setTextSize(50);  
     // Setting a view for daydream screen  
        setContentView(tView);  
   }  
 }  

Now, the second step is to make entry in AndroidManifest.xml file.

Step 3:


     android:name=".MyDayDreamService"
     android:exported="true"
     android:label="My Day Dream" >
     
        android:name="android.service.dreams.DreamService" />
        android:name="android.intent.category.DEFAULT" />


That's it! Now install your application on your Android device.
You can find your daydream under Settings -> Display -> DayDream menu.

You can also provide setting for your daydream for let user customize the dream like changing font color, screen brightness, etc. For providing setting button beside your daydream you need to add metadata tag to your AndroidManifest.xml file where we declare the daydream service in Step 3.

Note: While creating the daydream simply create a Activity for developing UI. This way you can easily test your daydream UI during development.

Tuesday, August 6, 2013

Understanding Android Project Structure (Eclipse)

In my previous post I showed you how to create a simple Hello World Android application. This post is about understanding the Android project structure with Eclipse.

As the Android project is also a simple JAVA project there is not much more difference between any standard JAVA project and Android project.

Android Project Structure
The above image shows the typical Android project structure in Eclipse IDE. Let's take a folder one by one.

assets/
This folder is empty. You can use it to store any raw files. All the files you save here are compiled into an .apk file as it is, and the original file name is preserved. You can navigate this directory in the same way as a typical file system using URIs and read files as a stream of bytes using the AssetManager.

gen/
This folder contains the all the JAVA files generated by ADT (Android Developer Tools), such as your R.java file, interfaces, etc.

res/
This folder contains Android application resources, such as layout files, drawable files, string values, etc.
  • colors/
    This folder is used to store XML files that describe colors.
  • drawable/
    This folder is meant for Bitmap files like PNG, JPEG, GIF and XLM files that describe any Drawable shapes or Drawable objects.
  • layout/
    All the XML files that are compiled into screen layouts and part for the Android application screen.
  • values/
    This folder stores all the XML files that are compiled into many kinds of resource. Unlike other resources in the res/ directory, resources written to XML files in this folder are not referenced by the file name. Instead, the XML element type controls how the resources is defined within them are placed into the R class.
  • menu/
    This folder is used to store the XML files that define application menus.
AndroidManifest.xml
Every Android application must have an AndroidManifest.xml file. The file name should not be change to any other name. Also the file should be in the root directory of your Android project. This file represents all the essential information about the Android application to the system. This information is used before the any of the application's code runs.

Thursday, August 1, 2013

Hello World Android

In my previous post I showed you how to setup a Android development environment. In this post I will show you writing your first Hello World Android application.

  1. Go to File Menu -> New -> Android Application Project.

    Drilling JAVA
    Hello World Android
  2. You will see the below screen once you click on the Android Application Project.

    Hello World Android
    Creating New Android Project

    The Application name and the project name can be differ as the project name is only used by the eclipse. But it should be unique in the workspace. Later on the application name will be used for creating the apk file. For example here the apk file will be created as HelloWorld.apk.

  3. Now it's time to configure the Android project. Here you can define the eclipse workspace location, Creating custom icon for you application, etc. 

    Drilling JAVA
    Configuring Android Project
  4. Now it's time to create your Android application icon. This icon will be displayed with the apk file as well as after installing the application as a short cut.

    Drilling JAVA
    Android Application Icon Creation
  5. After clicking on next you will see the below screen. This screen offers you to create the main activity where the application starts. It is a starting point of any android application.
    Android Activity Creation
    Create Android Activity
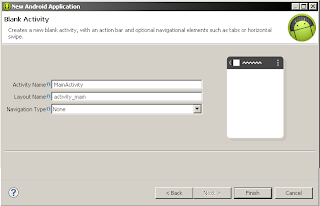
    Select blank activity for now. It will create a new blank activity, with an action bar and optional navigational elements such as tabs or horizontal swipe.
  6. Once you click on next after creating the blank activity, you will see the below screen. This screen is meant for defining a custom name for the main activity. By default it is MainActivity and layout name is main_activity.xml.
    Android Main Activity
    Configuring Android Main Activity
  7. On click of finish, the project will be created in the eclipse workspace.


Saturday, July 27, 2013

Understanding Android SDK Manager

The original SDK package you have downloaded includes only the SDK tools. The Android SDK is a separate tools, platforms and other components into packages you can download using the Android SDK Manager. To develop an Android app, you must have downloaded at least one Android platform and the latest SDK platform tools.

There are several different packages available for the Android SDK.ded at least one Android platform and the latest SDK platform tools. I will show you how to add Platforms and Packages.

First of all, launch the SDK Manager.
  • If you are using Eclipse then go to Windows > Android SDK Manager
  • On Windows, double-click the SDK Manager.exe file at the root of the Android SDK directory.
  • On Mac or Linux, open a terminal and navigate to the tools/ directory in the Android SDK, then execute android sdk.
Once you open the SDK Manager, it will show you the below window.
Drilling Android
Android SDK Manager
Here you can choose all the packages you want to download by selecting the checkboxes. Once you select all the packages you want to use, click on Install to downlaod and install the selected packages.


Tuesday, July 23, 2013

Easiest way to setup Android Development Environment

In my previous post I showed you how to set up an Android development environment using existing IDE. In this post I will show you how you can setup the Android development environment in easy way and start creating apps.

All you need to do is download the ADT Bundle that's it. The ADT Bundle is incorporated with all the things you required to start developing Android apps. It includes a version of the Eclipse IDE with build in Android Developer Tools generally called ADT.

After downloading the ADT Bundle which is a .zip file you need to install the SDK and Eclipse IDE. Follow the below steps to do so.


  • Unpzip the ZIP file (named adt-bundle-.zip) and save it to an appropriate location, such as a "Android_Development" directory in your home directory.
  • Then open the adt-bundle-/eclipse/ directory and click on eclipse.exe to launch eclipse.

Please keep in mind that Never ever try to shift any of the files or directories from the adt-bundle directory. If you do so, the ADT will not be able to locate the SDK and you will have to manually update the ADT from preferences.

Great! Now the IDE is already loaded with the Android Developer Tools plugin and the SDK is ready to go. In my next blog I will show how to develop your first Android app.